
Table of Contents
ToggleInstalling a 7.1 home theater system transforms a living room into a true cinema experience. Unlike basic stereo sound or even 5.1 setups, a 7.1 configuration adds rear surround speakers that place the listener inside the action, whether it’s hearing footsteps circle behind during a thriller or feeling the rumble of an explosion move across the room. For homeowners ready to upgrade their entertainment space, a 7.1 system offers professional-grade audio without requiring a dedicated home theater room. This guide covers what makes a 7.1 system different, how to choose the right components, and how to install it yourself.
Key Takeaways
- A 7.1 home theater system adds rear surround speakers that create a more immersive, enveloping soundstage compared to traditional 5.1 setups, especially for larger rooms over 200 square feet.
- Proper speaker placement is critical: front speakers at 22–30 degrees inward, side surrounds at 90–110 degrees, rear surrounds at 135–150 degrees, and all at consistent heights for coherent sound.
- Choose components based on room size—receiver-in-a-box packages work for smaller rooms ($500–$1,200), while larger spaces benefit from separates or tower speakers ($1,500–$3,000+) for better performance.
- DIY installation is achievable with basic tools: run 14–16 AWG speaker wire through walls or raceways, mount speakers securely to studs, and always run auto-calibration using the receiver’s built-in microphone.
- A 7.1 system sits between basic surround sound and advanced formats like Dolby Atmos, offering significant immersion without ceiling speakers while keeping the door open for future upgrades.
What Is a 7.1 Home Theater System?
A 7.1 home theater system consists of seven speakers plus one subwoofer. The “7” refers to seven directional channels: three front speakers (left, center, right), two side surround speakers, and two rear surround speakers. The “.1” designates a dedicated subwoofer that handles low-frequency effects (LFE) below 120 Hz.
This configuration builds on the more common 5.1 setup by adding two rear surround speakers behind the listening position. Those extra speakers create a more enveloping soundstage, particularly for movie soundtracks mixed in Dolby TrueHD or DTS-HD Master Audio formats. Games and streaming content increasingly support 7.1 channels as well.
The system requires an AV receiver with at least seven amplified channels and the ability to decode multichannel audio formats. Entry-level receivers typically output 75–100 watts per channel: mid-tier models deliver 100–125 watts. Higher wattage matters more for larger rooms or less efficient speakers.
While 5.1 remains the baseline for surround sound, and newer object-based formats like Dolby Atmos add height channels, 7.1 sits in a sweet spot: it delivers significantly better immersion than 5.1 without requiring ceiling-mounted speakers or complex calibration.
Key Benefits of Upgrading to a 7.1 Surround Sound Setup
The primary advantage of 7.1 over 5.1 is improved rear soundstage. In a 5.1 system, the two surround speakers sit to the sides of the listener, creating a front-to-side sound envelope. A 7.1 system adds dedicated rear speakers, which means sounds can originate from directly behind and travel forward, critical for scenes with approaching vehicles, ambient environmental effects, or multi-directional action sequences.
For rooms larger than 15×20 feet, side surrounds alone often can’t fill the space effectively. The rear speakers close that gap, especially if seating is more than 10 feet from the back wall.
Another benefit: better dialogue clarity during complex soundtracks. With rear channels handling ambient and directional effects, the center channel can focus purely on dialogue without competing for mix priority. This separation reduces the need to ride the volume control during quiet dialogue scenes followed by loud action.
7.1 systems also provide more headroom for future upgrades. Many AV receivers that support 7.1 can be configured for Atmos or DTS:X later by reassigning two channels to height speakers, creating a 5.1.2 setup. That flexibility protects the investment if home theater formats continue evolving.
Finally, modern home theater systems often include room calibration software (Audyssey, YPAO, Dirac Live) that works more effectively with additional speakers, fine-tuning frequency response and time alignment across all seven channels.
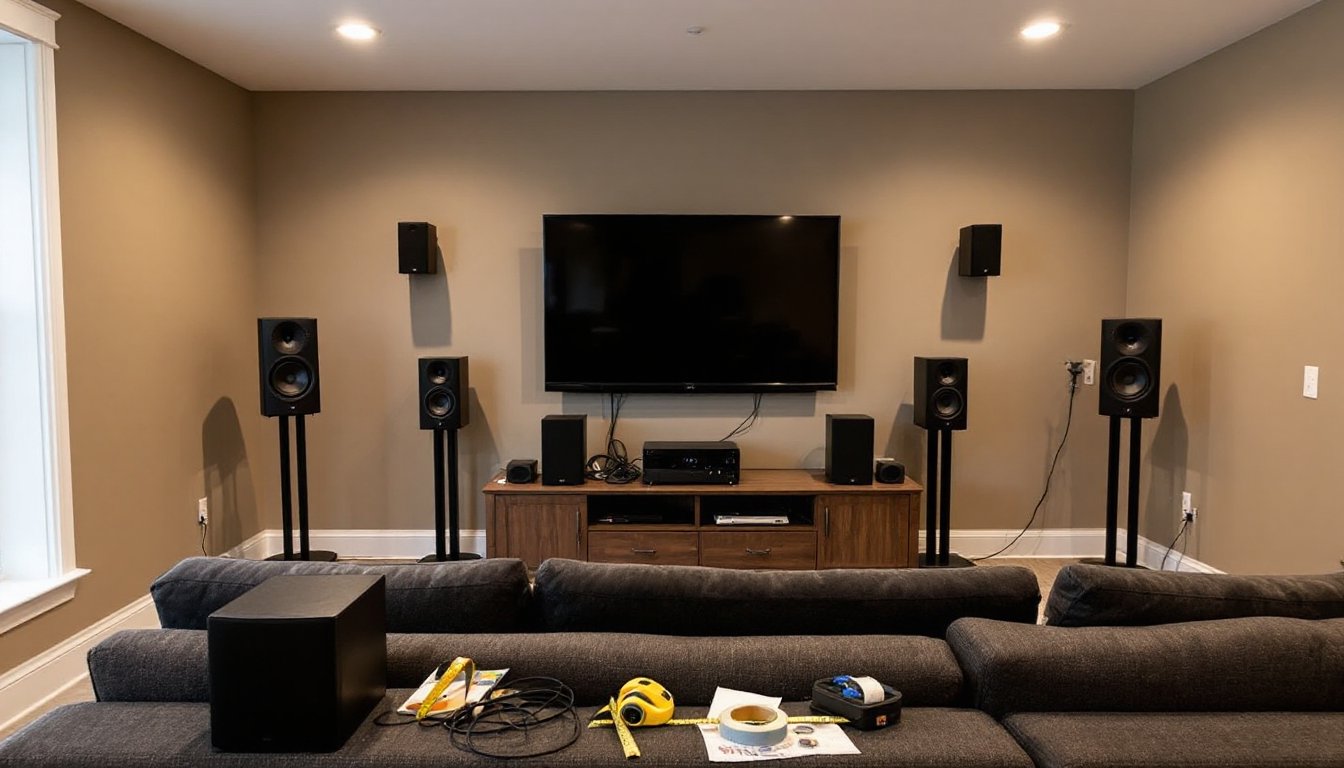
Understanding the Speaker Configuration and Placement
Proper speaker placement determines whether a 7.1 system delivers immersive sound or just loud noise. Each speaker serves a distinct role, and positioning them correctly requires measuring angles and distances from the primary listening position.
Front and Center Channel Speakers
The left and right front speakers should sit at equal distances from the center of the seating area, angled inward at roughly 22–30 degrees from the centerline. Place them at ear height when seated, typically 36–42 inches off the floor. If using floor-standing towers, the tweeter should align near ear level: bookshelf speakers often need stands.
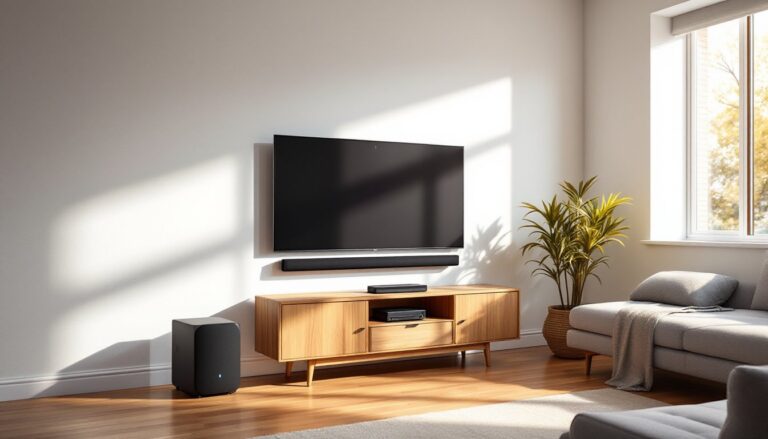
The center channel speaker anchors dialogue and on-screen sound effects. Mount it directly above or below the TV screen, as close to the display as possible. If using a TV stand, place the center speaker at the front edge: if wall-mounting the TV, consider a center channel with keyhole mounts. The center should be no more than 24 inches vertically offset from the left and right fronts to maintain a coherent front soundstage.
All three front speakers should ideally come from the same product line or at least share similar timbral characteristics. Mismatched tweeters (dome vs. ribbon, for example) create audible seams as sound pans across the front stage.
Surround and Rear Speakers
The side surround speakers mount 90–110 degrees from the centerline, slightly above ear level (typically 5–6 feet high). If the seating is against the back wall, push them forward so they’re not directly beside listeners’ heads, aim for 2–3 feet in front of the seating position.
The rear surround speakers should be placed 135–150 degrees from the centerline, essentially behind and slightly to the sides of the seating. Mount them at the same height as the side surrounds for consistent timbre. If the back wall is close, use bipole or dipole surrounds to diffuse sound: if there’s more than 4 feet of clearance, direct-radiating speakers work fine.
The subwoofer is less critical for placement since bass below 80 Hz is largely non-directional. Start by placing it near a front corner, then experiment with the “subwoofer crawl”: place the sub at the main listening position, play bass-heavy content, and crawl around the room’s perimeter to find where bass sounds smoothest and most even. That’s where the sub should go. Avoid placing it in the exact center of a wall, which can create nulls.
Use a measuring tape and painter’s tape to mark speaker positions before drilling. Most installation guides recommend drawing a diagram with precise angles and distances to ensure symmetry.
Choosing the Right 7.1 System for Your Space and Budget
Selecting components depends on room size, existing infrastructure, and how much wiring complexity is acceptable. Start by measuring the room and noting obstacles: windows, doorways, vaulted ceilings, open floor plans.
For rooms under 200 square feet, a receiver-in-a-box (RIB) system works well. These include a matched speaker set and receiver for $500–$1,200. Brands like Onkyo, Denon, and Yamaha offer RIB packages with adequate power for moderate volumes. Speakers are typically compact satellites with a powered subwoofer, making installation simpler but sacrificing some fidelity.
Mid-sized rooms (200–400 square feet) benefit from separates: a dedicated AV receiver ($400–$800) paired with bookshelf or small tower speakers ($100–$300 each) and a quality subwoofer ($300–$600). Look for receivers with at least 100 watts per channel into 8 ohms, HDMI 2.1 for 4K/120Hz passthrough, and room correction software. Match speaker impedance (4, 6, or 8 ohms) to the receiver’s spec sheet to avoid overheating.
Larger rooms or dedicated theater spaces call for floor-standing towers as fronts, which provide better bass extension and dynamic range without requiring extreme subwoofer output. Budget $1,500–$3,000 for a full system with quality components. Consider THX-certified speakers if the goal is reference-level cinema performance.
Wireless vs. wired: Some systems offer wireless rear speakers, which eliminate the need to run speaker wire across the room. But, they still require power outlets near each rear speaker and can introduce slight latency. Wired connections remain more reliable and avoid potential interference from Wi-Fi networks or cordless phones.
Check whether the room has existing in-wall wiring from a builder’s prewire package. If so, ensure speaker wire gauge is at least 16 AWG for runs under 50 feet: 14 AWG is better for longer distances or lower-impedance speakers.
Don’t forget cables: budget $50–$100 for quality speaker wire, banana plugs or spade connectors, and HDMI cables. Avoid overspending on exotic cables, but don’t use the thinnest wire possible either.
DIY Installation Tips for Your 7.1 Home Theater
Installing a 7.1 system is within reach for most DIYers, especially if you’re comfortable running wire through walls or along baseboards. The job typically takes a full weekend if you’re concealing wires: a few hours if you’re okay with surface-mounted cable raceways.
Start with the receiver location. Place it in a ventilated cabinet or rack with at least 3 inches of clearance on all sides. AV receivers generate significant heat: blocking vents shortens lifespan. If stacking components, use spacers or a small fan.
Running speaker wire: For walls with accessible attic or crawl space, use a fish tape to pull 14 or 16 AWG in-wall rated (CL2 or CL3) speaker wire from the receiver location to each speaker position. Mark both ends with labels. If running wire through finished walls isn’t feasible, use flat speaker wire that tucks under baseboards or paintable cable raceways.
Avoid running speaker wire parallel to electrical wiring for more than a few feet, this can introduce hum. Cross electrical at 90 degrees when necessary.
Mounting speakers: Use drywall anchors rated for at least twice the speaker weight if you’re not hitting studs. A stud finder is essential: toggle bolts work for drywall, but lag bolts into studs are far more secure for heavier speakers. Most bookshelf and surround speakers include keyhole slots or threaded inserts: bring a level and measure carefully before drilling.
For rear speakers, consider adjustable brackets that allow tilting and swiveling after installation, making it easier to fine-tune aim during calibration.
Calibration: Once everything is wired, run the receiver’s auto-calibration routine using the included microphone. Place the mic at the main listening position (typically head height when seated). The system will send test tones to each speaker and adjust levels, crossover points, and delays.
After auto-calibration, play familiar content and listen critically. If dialogue sounds thin, bump the center channel +1 to +2 dB. If bass is muddy, lower the subwoofer level or adjust the crossover frequency (80 Hz is standard).
Safety: Wear safety glasses and a dust mask when drilling into walls or ceilings: old homes may contain lead paint dust. Turn off power to any outlets or switches near your drilling area to avoid hitting live wires. If you’re uncomfortable fishing wires through walls or working near electrical, hire a low-voltage installer for the wiring portion, this typically costs $200–$500 and doesn’t require an electrician’s license in most jurisdictions.
A properly configured surround system should sound balanced from the main seating area, with no single speaker drawing attention to itself. If one speaker is noticeably louder or seems to dominate the mix, recheck wiring polarity (positive to positive, negative to negative) and re-run calibration.
Finally, label everything: speaker wires at the receiver end, HDMI inputs, and any wall plates. Future troubleshooting or upgrades will be much easier with clear documentation.