
Table of Contents
ToggleChoosing the right home theater seating isn’t just about comfort, it’s about maximizing sightlines, managing room acoustics, and creating an experience that rivals commercial cinemas. Whether you’re converting a basement, a spare bedroom, or a dedicated media room, seating dictates how many people you can fit, where you place your screen, and how immersive your setup feels. Unlike living room furniture, home theater seating needs to account for viewing angles, row elevation, and long sessions without fidgeting. This guide breaks down what separates mediocre seating from the kind that makes guests never want to leave.
Key Takeaways
- Best home theater seating balances ergonomics, viewing geometry, and acoustic transparency to create a cinematic experience that rivals commercial theaters.
- Proper viewing angles are critical: position eyes at or slightly below the screen’s vertical center, with the screen filling 30–40 degrees of your horizontal field of view from primary seating.
- Row spacing and elevation matter—maintain 36 inches between rows for walkability and use 12–15 inches of riser height between elevated rows to ensure unobstructed sightlines.
- Premium recliners range from $800–$3,000+ with features like zero-gravity recline, motorized lumbar support, and home automation integration, while mid-range modular seating ($400–$800 per seat) offers flexibility for irregular room layouts.
- Budget-friendly options under $400 per seat include stationary fabric chairs, repurposed commercial theater seating, or DIY-constructed benches with high-density foam, all viable for dedicated theaters on a tight budget.
- Plan electrical outlets for power recliners at 12–18 inches above floor level (one outlet per two seats minimum) and ensure adequate aisle clearance (22 inches minimum) and door swing space before finalizing your seating layout.
What Makes Great Home Theater Seating?
Great home theater seating balances ergonomics, viewing geometry, and acoustic transparency. The ideal chair supports your lower back and neck during two-hour movies without causing pressure points, which means look for contoured lumbar support and padded headrests. Viewing geometry matters more than most people think: seats should position eyes at or slightly below the vertical center of the screen, and the screen should fill roughly 30–40 degrees of your horizontal field of view from the primary seating position.
Acoustic transparency refers to how much sound your seating absorbs or reflects. Leather and bonded leather reflect sound, which can create minor echo issues in smaller rooms, while fabric upholstery absorbs mid and high frequencies. If you’re running a calibrated surround system, fabric is often the better choice. Also, seat height and recline angle affect speaker placement, reclined positions shift your ears lower, which may require adjusting speaker toe-in or tilt.
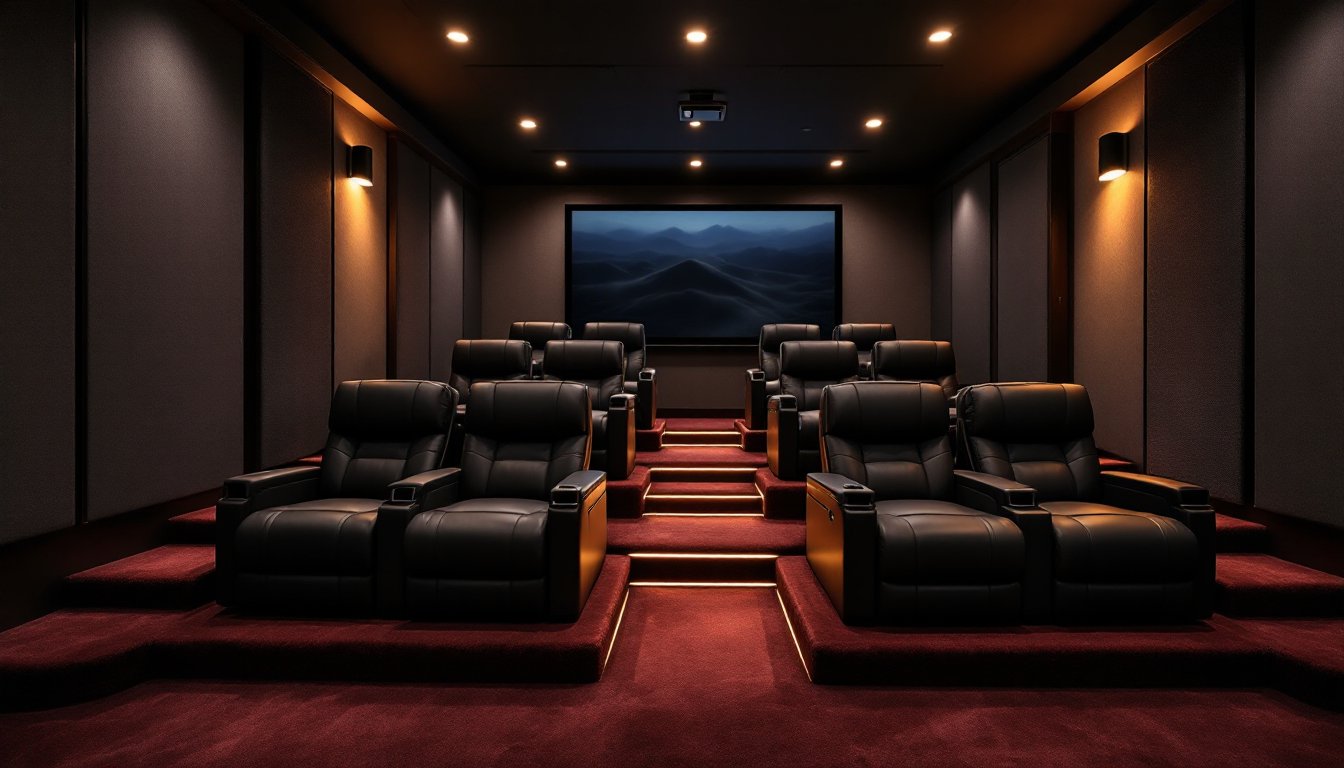
Consider row spacing if you’re planning tiered or multiple rows. The IRC doesn’t mandate specific spacing for residential theaters, but a practical minimum is 36 inches between rows for walkability and comfortable legroom. If you’re building a riser platform for a second row, 12 inches of elevation per row is a good baseline for unobstructed sightlines. Always wear safety goggles and a dust mask when cutting riser framing lumber or MDF.
Other critical features include cup holders (built-in or removable), power reclining mechanisms (manual vs. electric), and USB charging ports for long binge sessions. Manual recliners are quieter and don’t require outlet access, but power recliners offer finer position control and memory settings on premium models. If you’re running electrical for power recliners, follow NEC Article 210.52 for outlet spacing and use a dedicated 15-amp circuit if you’re powering four or more motorized chairs.
Top Home Theater Seating Options for Every Budget
Premium Recliners and Power Loungers
Premium home theater recliners start around $800–$1,500 per seat and climb to $3,000+ for models with layered memory foam, powered headrests, ambient lighting, and ventilated upholstery. Top-tier units feature zero-gravity recline, which elevates your legs above your heart to reduce pressure and improve circulation during marathon viewing. Many also include adjustable lumbar and neck support with independent motors, so each viewer can dial in their ideal posture.
Materials matter at this price point. Full-grain leather offers durability and a premium look but requires regular conditioning to prevent cracking. Top-grain leather is nearly as durable and slightly more forgiving on maintenance. For households with kids or pets, consider performance fabrics like microfiber or Crypton, which resist stains and hold up to scrubbing. Some high-end models offer swappable upholstery panels, letting you replace just the armrests or seat cushions instead of the entire chair.
Power recliners at this level typically include wireless control modules and can integrate with home automation systems via IR or RS-232. If you’re running a Control4 or Crestron system, verify compatibility before purchasing. Also, check weight capacity, most premium recliners support 250–300 pounds, but heavy-duty models go up to 400 pounds.
Mid-Range Sectionals and Modular Seating
Mid-range options run $400–$800 per seat and often come in sectional or modular configurations, which offer better flexibility for irregularly shaped rooms. Modular units let you arrange straight rows, L-shapes, or curved arcs depending on your screen placement and room geometry. Look for frames built from kiln-dried hardwood or engineered wood composite, avoid particleboard, which sags under sustained use.
At this price point, you’ll find manual recliners with steel or aluminum mechanisms rated for 25,000–50,000 cycles. That’s roughly 10–20 years of daily use, assuming one recline per viewing session. Padding thickness varies, but look for at least 4 inches of high-density foam (2.0+ lb/ft³ density) in the seat cushion. Anything thinner compresses too quickly and loses support.
Many mid-range sectionals include storage consoles with flip-up lids for remotes, cables, and snacks. These are genuinely useful in dedicated theater rooms where you don’t want clutter visible. Some consoles include tray tables that slide out and lock, which beat balancing a plate on your armrest. If you’re considering a console seat, measure clearance, most add 8–10 inches of width compared to a standard seat.
One often-overlooked advantage of sectionals is easier installation. Premium recliners can weigh 120–180 pounds each and require two people to maneuver through doorways and down stairs. Modular sectionals break into lighter pieces that one person can handle, which matters if you’re working solo or navigating tight basement staircases.
Budget-Friendly Alternatives That Don’t Sacrifice Comfort
You can build functional home theater seating for $200–$400 per seat if you’re willing to compromise on materials and features. Stationary theater chairs with fixed backs and padded armrests start around $200 and work fine for smaller rooms or secondary viewing areas. These typically use bonded leather (shredded leather scraps bonded with polyurethane), which looks decent initially but peels after 2–3 years. If appearance matters long-term, step up to fabric upholstery.
Another solid budget option is repurposing commercial cinema seating. Theater renovation companies and liquidation auctions occasionally sell used seats for $50–$150 each. These are built to withstand thousands of uses and often include fold-down seats and cup holders. The catch: they’re heavy (often 80–100 pounds per seat due to steel frames), require floor mounting, and may need reupholstery. If you’re handy with a staple gun and foam padding, this route offers incredible durability for the price.
For budget-conscious home theater setups, consider modular floor cushions or oversized bean bags rated for adult use. These aren’t ideal for dedicated theaters, but they work well in multi-purpose spaces where you want flexible seating. Look for products with removable, washable covers and shredded memory foam fill, traditional bean bag fill (EPS beads) compresses flat within months.
DIY builders can construct basic theater seating using 2×4 framing, plywood bases, and high-density foam. A simple two-seat bench frame costs roughly $80–$120 in materials (depending on lumber prices) and takes a weekend to build. Add 4-inch foam cushions ($40–$60 per seat from upholstery suppliers) and fabric covering. This approach works especially well if you’re building tiered rows with risers, since you can integrate seat framing directly into the riser structure. Always use construction adhesive and 3-inch screws (not nails) for joints, and pre-drill to avoid splitting.
How to Choose the Right Seating for Your Space
Start by measuring your room dimensions and marking the throw distance (screen to seating distance). For a 100-inch diagonal 16:9 screen, you’ll want primary seating 10–13 feet back for an immersive experience without neck strain. If you’re closer than 1.5× the screen width, you’ll be turning your head to follow action: farther than 2.5× and you lose immersion. Use painter’s tape on the floor to mock up seat footprints, most theater recliners occupy 38–42 inches width and 60–72 inches depth when fully reclined.
Account for aisle clearance. If you’re seating more than two people per row, leave at least 22 inches of aisle width on one side so viewers can exit without climbing over others. Building codes don’t mandate specific aisle widths for single-family residential theaters, but this dimension matches commercial standards and prevents awkward shuffling during bathroom breaks.
Consider door swing clearance if you’re placing seats against side walls. A standard interior door needs 36 inches of clearance to open fully. Recliners placed too close to doorways create bottlenecks and ding the furniture. If space is tight, consider pocket doors or barn-style sliders, though note that barn doors can leak light and sound.
For power recliners, map out outlet locations. You’ll need one outlet per two seats minimum, positioned low on the wall (12–18 inches above floor level) to avoid visible cord runs. If you’re finishing a basement theater, install outlets before drywall goes up. Running conduit through finished walls is possible but annoying, you’ll need a flexible drill bit and fish tape, and you risk hitting existing wiring or plumbing.
Think about row elevation if you’re planning multiple rows. According to design principles from leading home publications, elevated seating rows require 12–15 inches of riser height to clear the heads of viewers in front. Build risers from 2×10 or 2×12 joists spaced 16 inches on center, topped with 3/4-inch plywood and finished with carpet or rubber stair tread for sound dampening. Always secure risers to wall studs or floor framing, freestanding risers can shift or tip.
Finally, evaluate HVAC and acoustics. Seating blocks airflow, so ensure return air vents aren’t positioned directly behind seat backs. If your room feels stuffy during use, you may need to add a supplemental return vent or quiet inline fan. For acoustics, fabric seating helps absorb flutter echo, especially in smaller rooms with parallel walls. If you’re running a calibrated system and notice mid-range muddiness, adding acoustic panels at first reflection points (side walls and ceiling) makes a bigger difference than upgrading seating materials. Many smart home and tech enthusiasts also integrate voice control and automated lighting with their seating layouts for a seamless experience.
Conclusion
The right home theater seating makes the difference between a forgettable setup and one you’ll use daily. Prioritize proper viewing geometry, adequate spacing, and build quality over flashy features. Measure twice, mock up your layout with tape, and don’t skimp on electrical planning if you’re going with power recliners. With thoughtful planning, any budget can deliver a theater experience worth staying home for.