
Table of Contents
ToggleConverting a basement into a home theater checks all the boxes: it’s naturally dark, typically isolated from living areas, and often sits underutilized. Unlike a living room setup, a dedicated basement theater lets homeowners control light, sound, and layout without compromise. The project spans multiple trades, framing, electrical, AV installation, and finish work, but most of it falls within intermediate DIY skills. Before swinging a hammer, check local building codes for egress windows, ceiling height minimums (typically 7 feet finished), and electrical permits. With proper planning, a basement theater delivers immersive entertainment and adds measurable value to a home.
Key Takeaways
- A basement home theater thrives because below-grade spaces naturally block exterior noise, eliminate light bleed, and maintain consistent temperatures year-round—advantages critical for immersive entertainment.
- Plan viewing distance by multiplying screen width by 1.5 to 2.5 to ensure comfortable immersion, and use riser platforms with 12-inch increments to elevate back rows for clear sightlines over front seats.
- Choose between a 4K projector (offering cinematic 120-inch scale for $1,500–$3,000) or a large flat-panel TV (better ambient light handling but capped at 85 inches), then pair it with at least a 5.1 surround sound system anchored by a quality AV receiver.
- Soundproofing requires mass and decoupling—use double-layer drywall with Green Glue damping compound and resilient channel isolation clips to prevent theater noise from disturbing adjacent spaces.
- Budget $3,000–$6,000 for a DIY bare-bones setup, $10,000–$20,000 for mid-range builds with seating and soundproofing, or $30,000+ for premium systems with Dolby Atmos and automation.
- Always check local building codes for egress window requirements, ceiling height minimums (typically 7 feet finished), and electrical permits before starting your basement home theater project.
Why Your Basement Is Perfect for a Home Theater
Basements offer advantages that above-grade rooms can’t match. Concrete walls and floor slabs naturally block exterior noise and vibration, creating acoustic isolation from neighbors and outdoor traffic. The lack of windows eliminates light bleed, which is critical for proper contrast ratios on projectors or large displays.
Temperature stability is another bonus. Below-grade spaces maintain more consistent temps year-round, reducing HVAC load during summer blockbuster marathons. Ceiling height matters, most finished basements sit at 7 to 8 feet, which works fine for seating but may limit overhead speaker placement for Atmos setups. If joists are exposed, you’ve got 9+ feet to work with before drywall.
Structural considerations come into play. Basement floors handle heavy seating without deflection issues common on upper-level floors. Load-bearing walls and posts can’t be removed without engineering approval, so plan your layout around existing structure. Check for moisture issues before starting, any active seepage or efflorescence needs remediation first. A damp basement will ruin electronics, finishes, and your investment.
Planning Your Basement Home Theater Layout
Start with room dimensions and screen size working backward. For a 120-inch diagonal screen (a common choice), you’ll need 10 to 15 feet of viewing distance for comfortable immersion. Multiply screen width by 1.5 for minimum distance, by 2.5 for maximum. That gives flexibility in seating rows.
Identify existing utilities that can’t move: sump pumps, electrical panels, HVAC equipment, and water heaters. Box them in with removable access panels if they’re in your theater footprint. Egress windows are non-negotiable if the basement counts as habitable space, IRC requires one operable opening with minimum 5.7 square feet of clear area and a 24-inch minimum opening height.
Mark stud locations (16 inches on center typical) and plan for dedicated 20-amp circuits for AV equipment. Projectors, amps, and powered subwoofers pull serious current. Route low-voltage wire (HDMI, speaker cable) through walls before closing them up, fishing wire through finished drywall is miserable.
Seating Arrangement and Viewing Distance
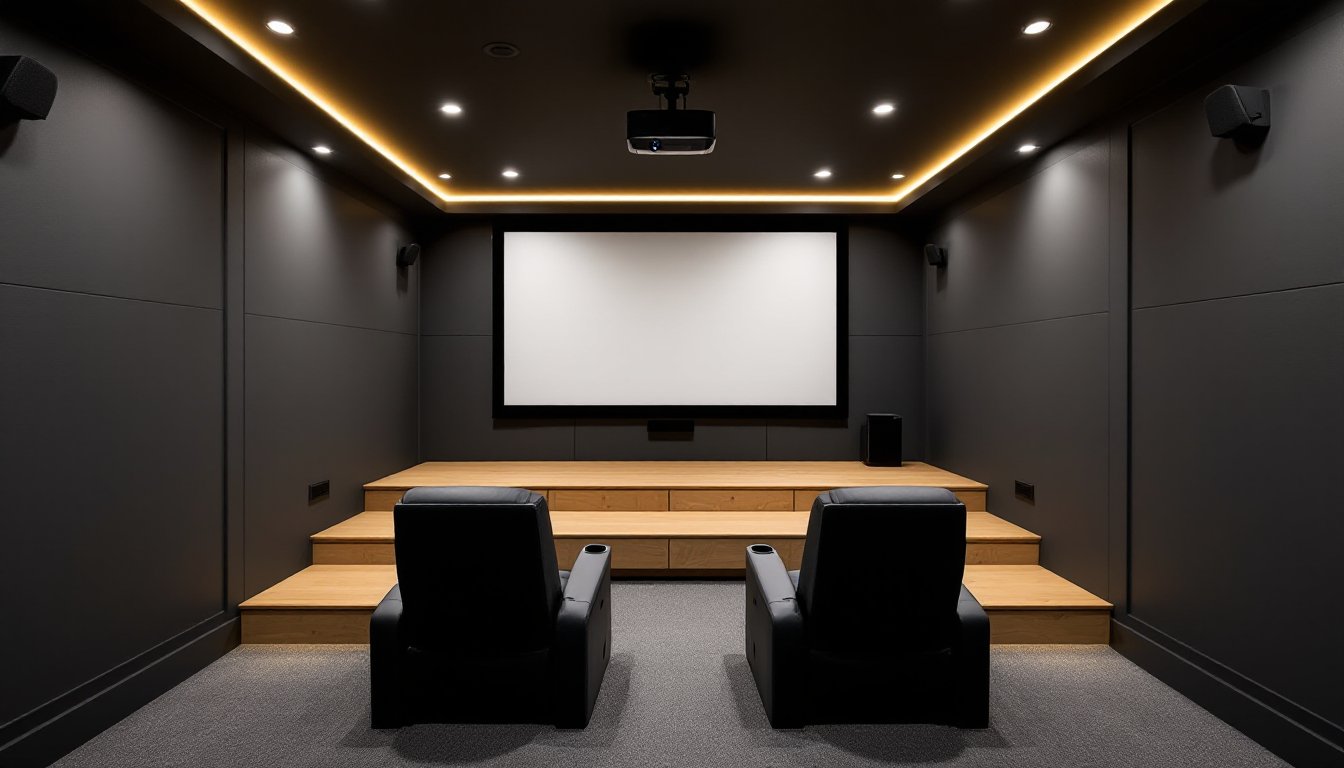
Riser platforms elevate back rows for clear sightlines over front seats. A single 12-inch rise works for two rows: add another 12 inches for a third. Build risers from 2×4 framing on 16-inch centers, topped with ¾-inch plywood and carpet. Secure to the slab with concrete anchors if the floor’s unfinished.
First-row seats should sit at a height where viewers’ eyes align with the bottom third of the screen. For a projector setup, this usually means 18 to 20 inches off the floor (standard couch height). Leave 36 inches between rows for legroom and exit access. Fixed theater seating has built-in cup holders and recline functions, but it’s pricey and permanent. Modular sectionals offer flexibility without custom installation.
Essential Equipment for Your Basement Theater
Display choice comes first: projector versus large TV. A quality 4K projector and 120-inch screen delivers cinematic scale for $1,500 to $3,000 combined. Equivalent screen size in a flat panel doesn’t exist outside commercial displays. Projectors need light control and ceiling mounts: TVs handle ambient light better but cap out around 85 inches for consumer models.
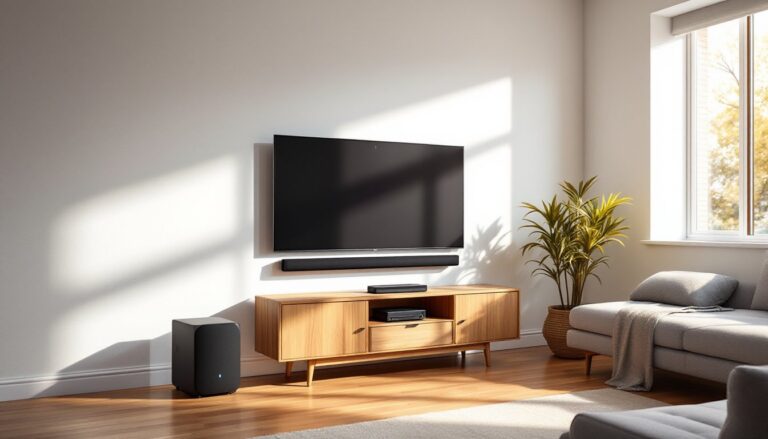
For audio, a 5.1 or 7.1 surround system is the baseline. That’s front left/center/right speakers, surround speakers, and a powered subwoofer. An AV receiver handles switching and decoding: look for 4K passthrough, HDR support, and enough HDMI inputs for your sources. In-ceiling speakers save floor space but require cutting drywall and running wire through joists, doable during framing, tough afterward.
Many homeowners researching home theater equipment prioritize HDMI 2.1 for gaming at 120Hz refresh rates. If the theater doubles as a game room, this spec matters. Otherwise, HDMI 2.0 handles 4K streaming fine.
Source components vary: streaming boxes (Roku, Apple TV, Fire Stick), Blu-ray players, game consoles, or media servers. Consolidate them in a ventilated AV rack or cabinet. Heat buildup kills electronics, add a small fan if airflow’s restricted.
Soundproofing and Acoustics Solutions
Soundproofing keeps theater noise from escaping: acoustic treatment controls sound inside the room. They’re different problems. For soundproofing, mass and decoupling work best. Double-layer ⅝-inch drywall with Green Glue damping compound between layers cuts sound transmission significantly. Stagger seams between layers so joints don’t line up.
Decouple walls from studs using resilient channel or sound isolation clips (RSIC). These products break the vibration path from drywall to framing. Standard fiberglass batt insulation (R-13 or R-15) in wall cavities absorbs mid and high frequencies. For serious isolation, build a room-within-a-room using staggered or double-stud walls, but that eats 8+ inches of floor space per wall.
Ceiling soundproofing follows the same logic: double drywall, Green Glue, and isolation clips on joists. If the basement’s below bedrooms, this step isn’t optional unless you enjoy family complaints. Drop ceilings work fine but provide minimal soundproofing unless you add mass-loaded vinyl or extra drywall above the grid.
Inside the room, treat flutter echo and standing waves. Acoustic panels on walls (2 to 4 inches thick) absorb reflections: position them at first reflection points, side walls at seated ear height, and the wall behind the screen. Bass traps in corners tame low-frequency buildup. DIY panels using Owens Corning 703 or Rockwool wrapped in fabric cost a fraction of retail acoustic products and perform identically.
Lighting Design for Maximum Immersion
Theater lighting has one job: stay invisible when the movie’s playing and provide enough light for safe movement when it’s not. Overhead recessed cans are common but create hotspots. Better option: rope lighting or LED strips along step edges, under seats, or in soffits. Warm white (2700K to 3000K) is less jarring than cool blue tones.
Install lighting on dimmers, hardwired dimmers for permanent fixtures, not plug-in lamp dimmers. Lutron Caseta or similar smart dimmers let you set “movie mode” scenes that fade lights down when playback starts. This requires neutral wires at switch boxes, which older homes may lack.
Testing covered in guides from home automation experts shows that bias lighting behind a TV or screen reduces eye strain during long viewing sessions. A simple LED strip in 6500K (daylight) behind the display does the job for under $20.
Avoid fixtures that spill light onto the screen. Side sconces should direct light down or back, never forward. If ceiling height allows, install lights in front of the first row, never between viewers and the screen. Use blackout shades or soundproof curtains over egress windows, even small light leaks kill contrast.
Budgeting Your Basement Theater Project
Costs vary wildly based on existing finish level, DIY versus contractor labor, and equipment choices. A bare-bones DIY setup, drywall, paint, basic projector and sound, runs $3,000 to $6,000 for a 200-square-foot space. That assumes you’re doing framing, electrical rough-in, and finish work yourself.
Mid-range projects with tiered seating, soundproofing, and decent AV gear land in the $10,000 to $20,000 range. This includes hiring an electrician for code-compliant wiring and possibly a low-voltage installer for speaker runs. Upper-tier builds with custom seating, Dolby Atmos, acoustic treatment, and automation easily hit $30,000+.
Break the budget into phases: structure and utilities first (framing, insulation, electrical, HVAC), then finishes (drywall, paint, flooring), then AV and seating. This lets you spread costs over time and live with a functional space while you upgrade equipment. Don’t cheap out on wire, run more HDMI and speaker cable than you think you need. Pulling wire later costs 10 times more in labor and drywall repair.
Material costs fluctuate. Lumber prices swing seasonally: electronics drop after new model releases. Research from DIY project guides consistently shows that homeowners save 40 to 60 percent on labor by tackling non-structural work themselves. If permits are required (egress windows, bedrooms, structural changes), factor in $500 to $1,500 for plan reviews and inspections.
Financing options include home equity lines of credit (HELOCs), cash-out refinances, or personal loans. A basement theater doesn’t add dollar-for-dollar value like a kitchen remodel, but it improves marketability and livability. Keep receipts and photos, they help with appraisals and insurance claims.