
Table of Contents
ToggleIf you’re tired of clothes piled on the floor and shoe avalanches every time you open the door, a closet organizer can transform chaos into functional storage. Home Depot carries a wide range of systems that fit most budgets and skill levels, from wire shelving kits to full-blown laminate configurations. Whether you’re tackling a master bedroom reach-in or a walk-in pantry, understanding your options, and how to install them correctly, makes the difference between a weekend win and a frustrating do-over.
Key Takeaways
- Home Depot closet organizers from brands like ClosetMaid and Rubbermaid offer modular systems ranging from budget-friendly wire shelving ($15–$25 per section) to premium laminate options ($200–$400), with same-day availability and a forgiving 90-day return policy.
- Proper installation requires measuring twice, locating studs, and anchoring brackets securely into wall studs rather than drywall alone, as shelves need to support up to 50 pounds per linear foot when properly mounted.
- Wire shelving works best for ventilation and flexibility, while laminate systems provide a furniture-grade look and better load capacity—choose based on your climate, aesthetic preferences, and the weight of items you’re storing.
- Plan your layout before purchasing by sketching where double-hang rods, single-hang sections, and shelves will go, with top rods typically at 80–84 inches and lower rods at 40 inches for double-hang setups.
- Most DIYers can install basic wire shelving systems in 2–4 hours with a cordless drill, stud finder, level, and tape measure, but professional installation ($150–$500) is worth considering for complex walls or walk-in closets.
- Avoid common failures by reading manufacturer instructions, avoiding immediate overloading of shelves, patching old holes before installation, and allowing 24 hours for anchors and paint to set before full use.
Why Choose Home Depot for Your Closet Organization Project
Home Depot offers several advantages that make it a go-to for DIY closet projects. First, inventory availability matters: most stores stock popular systems like ClosetMaid and Rubbermaid Configurations in-store, so you can walk out same-day with everything you need. That beats waiting on shipping when you’re mid-project.
Second, the return policy is forgiving. If your measurements are off or you change your mind mid-install, returns within 90 days (with receipt) give you flexibility. Always save your receipts and keep hardware packaging intact until installation is complete.
Third, Home Depot provides design tools and in-store assistance. The online closet planner lets you input dimensions and visualize configurations before buying. In-store associates can pull measurements from your sketch and generate a cut list for wire shelving or laminate panels. If you’re unsure about load capacity or mounting hardware for your wall type, ask, most stores have at least one associate with install experience.
Finally, installation services are available if you’d rather not DIY. Pricing varies by market, but Home Depot contracts with local installers who are typically licensed and insured. The service includes measurement, delivery, and install, which can be worth the cost if your closet has tricky angles or you’re short on time.
Top Home Depot Closet Organizer Systems Worth Considering
Home Depot carries several brands, but two dominate the DIY space for good reason: ClosetMaid and Rubbermaid. Both offer modular systems that don’t require permanent mounting, which matters if you’re in a rental or plan to reconfigure later.
ClosetMaid: Budget-Friendly Versatility
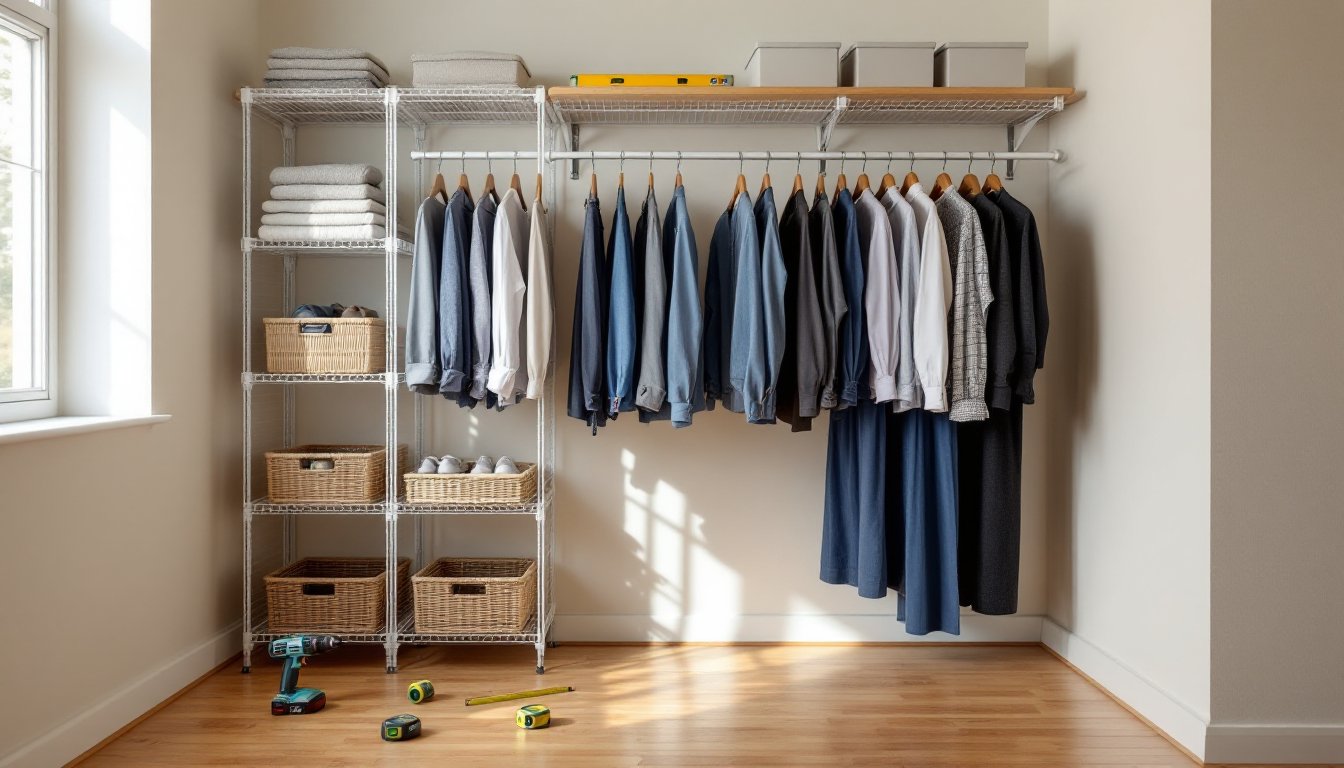
ClosetMaid wire shelving is the entry point for most DIYers. The standard 12-inch-deep wire shelves start around $15–$25 per 4-foot section, and you can find them in white, nickel, or bronze finishes. Wire systems mount to wall studs using plastic clips and metal brackets, find your studs with a stud finder before you start, because drywall anchors alone won’t support a loaded shelf.
Wire shelving is easy to cut with bolt cutters or a hacksaw if you need a custom width. The ventilated design prevents dust buildup and works well in humid climates where solid shelving might trap moisture. Downsides? Small items (belts, jewelry, folded socks) can slip through the wire grid, and the front rod can leave creases on folded sweaters. Use shelf liners or bins to solve both issues.
ClosetMaid also makes laminate systems (the SuiteSymphony line) if you want a cleaner, furniture-grade look. These use ¾-inch melamine-coated particleboard and hang on a metal rail system. Expect to pay $200–$400 for a starter kit that covers a 6-foot reach-in closet. Laminate holds up better under heavy loads and looks more custom, but it’s less forgiving if your walls aren’t plumb, plan on shimming during install.
Rubbermaid Configurations: Customizable and Durable
Rubbermaid Configurations splits the difference between wire and laminate. The system uses resin-coated wire shelves with a reinforced front edge, so you get the ventilation of wire without the sagging. The Deluxe Kit (around $100–$150 for a 4-to-8-foot closet) includes shelves, hanging rods, and all mounting hardware.
What sets Rubbermaid apart is the Upright and Rail system, vertical standards mount to studs, and shelves slide into place without tools. This makes adjustments easy: if you need to shift a shelf up 3 inches to fit boots, you just pop it out and reposition it. The trade-off is that the uprights are visible, which some people dislike aesthetically. Paint them to match your wall if that bothers you.
Both systems support 50 pounds per linear foot when properly anchored to studs. If you’re storing heavy items like luggage or seasonal coats, add a center support bracket every 3 feet. Many DIYers skip this and end up with sagging shelves after six months.
Planning Your Closet Organizer Installation
Measure twice, buy once. Start by measuring the width, depth, and height of your closet. Note the location of studs (typically every 16 inches on center, sometimes 24 inches), outlets, light fixtures, and any existing shelf support holes you want to reuse or patch.
Sketch a rough layout before you shop. Decide where you want double-hang rods (two rods stacked vertically for shirts and pants), single-hang sections (for dresses or coats), and shelving for folded items or bins. Most systems recommend the top rod at 80–84 inches from the floor, with the lower rod at 40 inches for double-hang setups. Leave 12 inches of clearance between the bottom rod and the lower shelf for hangers.
Consider depth carefully. Standard closets are 24 inches deep, but shelves deeper than 16 inches can be hard to reach in a reach-in configuration. Wire shelving typically comes in 12-inch, 16-inch, or 20-inch depths. Laminate kits are usually 14 inches. If your closet is shallow, stick with 12-inch shelves and use the extra depth for baseboard clearance.
Wall type affects your hardware. Drywall over studs is standard, you’ll use 2-inch wood screws into studs for brackets. Plaster walls (common in older homes) need toggle bolts or molly bolts for areas between studs, and you’ll want to pre-drill to avoid cracking. Concrete or block walls (basement closets) require masonry anchors and a hammer drill. If you’re not sure what you’re working with, tap the wall: drywall sounds hollow, plaster sounds denser, and concrete doesn’t give at all.
Many organization experts on home storage recommend decluttering before installation. Pull everything out, donate or toss what you don’t wear, and measure what’s left. If you own 30 pairs of shoes, plan for that. If you have five winter coats, build a single-hang section wide enough to avoid crowding.
DIY Installation vs. Professional Services at Home Depot
Most wire shelving systems are beginner-friendly. If you can use a level, drill, and stud finder, you can handle a basic wire shelf install in a 6-foot reach-in closet in 2–4 hours. You’ll need:
- Cordless drill with Phillips and drill bits
- Stud finder (magnetic or electronic)
- Level (a 24-inch or 48-inch is ideal)
- Tape measure
- Pencil
- Safety glasses (drywall dust and metal shavings)
- Hacksaw or bolt cutters (if you need to cut shelving)
Start by locating studs and marking them with painter’s tape. Install the back support rail first (this is the metal track that the shelf brackets clip into), checking for level as you go. Mount brackets into studs, then clip shelves into place. Double-check level at each step, wire shelving is forgiving, but a shelf that’s ⅛ inch off level per foot will look noticeably sloped over 6 feet.
Laminate systems are more complex. The rail system mounts level to the wall, then vertical panels and shelves hang from it. You’ll need a second person to hold panels steady while you secure them, and the weight of laminate means you can’t fudge stud placement. If your studs don’t align with the panel layout, you’ll need to add blocking (horizontal 2x4s screwed into studs behind the drywall) or use heavy-duty anchors rated for 75+ pounds. This is where DIY projects can go sideways if you’re not comfortable with the extra carpentry.
Home Depot’s professional installation service runs roughly $150–$500 depending on closet size and system complexity. The installer measures, delivers materials, and completes the job in one day. This makes sense if:
- Your walls aren’t standard (plaster, concrete, or badly damaged drywall)
- You’re installing a walk-in system with 10+ linear feet of shelving
- You don’t own the necessary tools
- You’re short on time or confidence
Professional installers also carry liability insurance, which matters if something goes wrong (like hitting a pipe or electrical line inside the wall). For tested recommendations on hiring help, check reviews of local installers through Home Depot’s service portal before booking.
If you go DIY, don’t skip prep work. Patch and paint old shelf bracket holes before installing the new system, leaving them open looks sloppy. If you’re painting the closet, do it before installation: cutting in around installed shelving is a hassle. Allow 24 hours for paint to cure before mounting hardware.
One common mistake: overloading shelves immediately after install. Give the anchors and brackets 24 hours to settle under light load before adding heavy bins or a full wardrobe. This is especially true for drywall anchors, which can creep under sustained weight.
Finally, read the instructions. Every system has specific torque recommendations for screws and spacing requirements for brackets. Skipping the manual is how you end up with a shelf that sags or pulls away from the wall after a month. Many home organization guides emphasize that following manufacturer specs prevents the majority of install failures.
Conclusion
A well-planned closet organizer from Home Depot can double your usable storage and make daily routines smoother. Measure carefully, choose a system that matches your skill level and budget, and don’t rush the install. Whether you go wire, laminate, or call in a pro, the key is anchoring to studs and keeping everything level. Take your time on prep work, and you’ll end up with a closet that works as hard as you do.