
Table of Contents
ToggleAnyone who’s sat through a blockbuster knows the real star isn’t always on screen, it’s that warm, buttery popcorn that somehow tastes better than anything made at home. The good news? Recreating that signature theater flavor isn’t reserved for cinema chains with industrial equipment. With the right tools, ingredients, and a few insider tricks, homeowners can set up a popcorn station that rivals the concession stand. This guide walks through everything needed to transform an ordinary kitchen into a cinema-quality snack operation, from choosing equipment to nailing that unmistakable golden coating.
Key Takeaways
- Movie theater popcorn’s signature flavor comes from three essential elements: coconut oil heated to 460°F, Flavacol seasoning for buttery taste and golden color, and high-heat equipment that creates fluffy kernels with fewer unpopped duds.
- Countertop kettle-style popcorn makers ($80–$200) are the gold standard for home theaters, while stovetop Whirley Pop models ($25–$40) offer an affordable, compact alternative for kitchens with limited counter space.
- Use refined coconut oil, yellow butterfly kernels, Flavacol salt added to oil before popping, and butter-flavored topping (not real butter) to accurately replicate theater popcorn at home.
- A well-designed popcorn station at home includes three functional zones—prep, popping, and serving—with proper ventilation, heat-resistant surfaces, and organized ingredient storage in airtight containers.
- Movie theater popcorn at home stays crisp for only about 30 minutes after popping, so prepare batches fresh and serve immediately for the best texture and flavor.
What Makes Movie Theater Popcorn So Irresistible?
The magic of theater popcorn comes down to three factors: coconut oil, flavacol seasoning, and high heat. Most home recipes fall short because they use butter or vegetable oil, which don’t replicate the distinct flavor profile theaters rely on.
Theaters typically pop kernels in 90% coconut oil heated to around 460°F. This oil has a high smoke point and imparts a subtle sweetness that pairs perfectly with salt. The second secret is Flavacol, a fine butter-flavored salt with FD&C Yellow #5 and #6 dyes that give popcorn its signature golden hue. Unlike table salt, Flavacol’s ultra-fine texture allows it to stick to kernels without weighing them down.
Finally, commercial poppers use high-wattage heating elements that create rapid, even popping. This produces lighter, fluffier kernels with fewer “old maids” (unpopped kernels). Home stovetop methods can get close, but dedicated equipment makes consistency easier to achieve.
Essential Equipment for Perfect Home Theater Popcorn
A dedicated popcorn maker isn’t strictly necessary, but it eliminates guesswork. Three main options exist: stovetop poppers, electric hot-air poppers, and countertop kettle-style machines.
Stovetop poppers like the Whirley Pop use a hand-crank stirring mechanism to keep kernels moving over direct heat. They’re affordable ($25–$40), compact, and allow oil-based popping for authentic flavor. The downside: they require constant attention and arm effort.
Electric hot-air poppers use circulating heat instead of oil, making them the healthiest option. But, they produce drier popcorn that doesn’t hold seasonings well. Oil and butter must be added after popping, which never quite matches the theater experience.
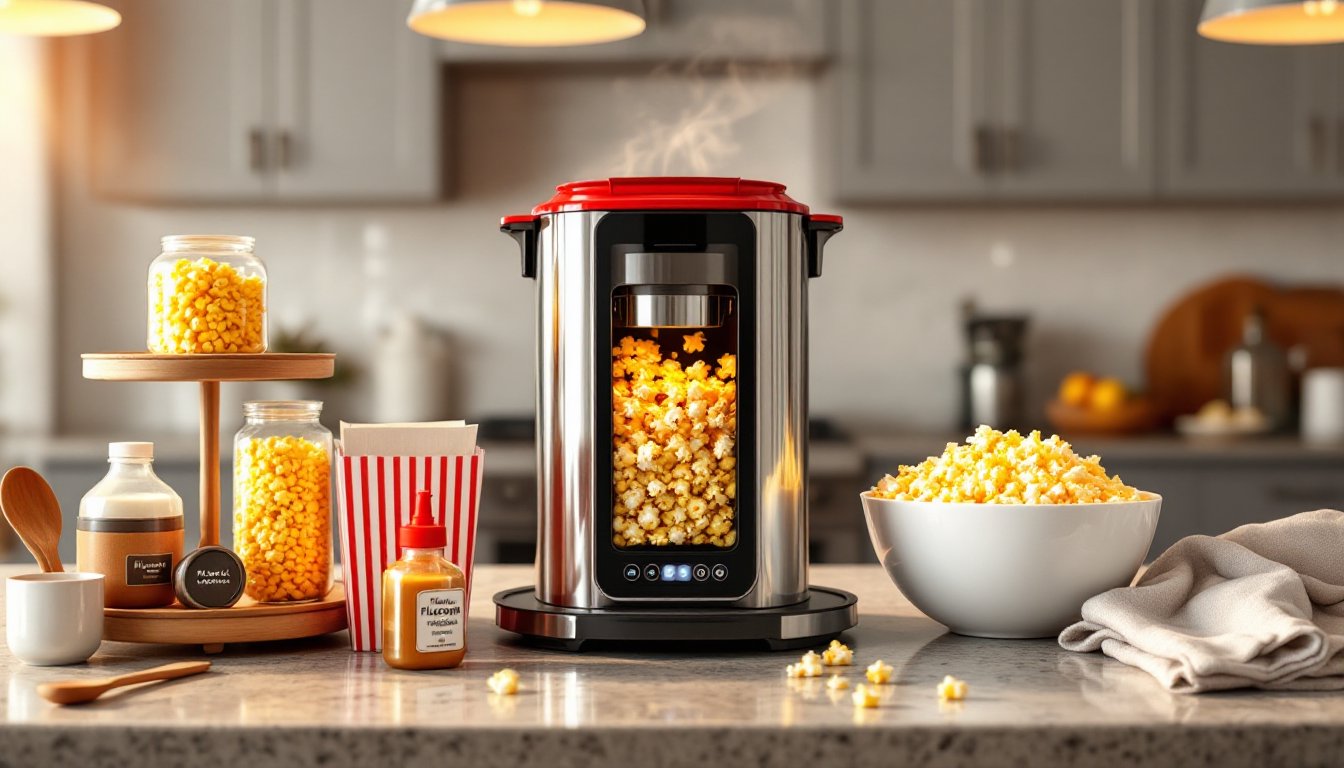
Countertop kettle machines are the gold standard for home theaters. Models with stainless steel kettles and built-in warming decks mimic commercial equipment. Expect to spend $80–$200 for a reliable 4-ounce or 6-ounce kettle unit. The larger 6-ounce size matches what professional equipment reviewers recommend for family-sized batches.
Choosing the Right Popcorn Maker for Your Space
Kitchen counter space and storage determine which machine works best. Countertop kettle machines occupy roughly 12 × 10 inches of counter space and stand about 20 inches tall. They’re not practical for small apartments or kitchens with limited countertop real estate.
For tight spaces, a stovetop Whirley Pop stores in a cabinet and only needs burner access during use. Electric hot-air models are similarly compact, typically around 8 inches in diameter.
Consider batch size, too. A 4-ounce kettle pops about 16 cups of popped corn per batch, enough for 3–4 people. The 6-ounce kettle yields roughly 24 cups, suitable for larger families or entertaining. Stovetop poppers generally handle 1/2 cup of kernels at a time, producing about 8 cups of popped corn.
Ventilation matters with oil-based popping. Kettle machines and stovetop poppers generate steam and some smoke at high temperatures. Run the range hood or crack a window to avoid setting off smoke detectors.
The Secret Ingredients Behind That Signature Flavor
Four ingredients separate theater popcorn from the microwave stuff: popcorn kernels, coconut oil, Flavacol, and butter-flavored topping.
Kernels: Yellow butterfly kernels are standard. They pop into irregular, “winged” shapes that catch seasoning. Mushroom kernels produce rounder popcorn used for caramel corn but aren’t ideal for buttered styles. Buy kernels in bulk, 50-pound bags run about $40–$60 and stay fresh for over a year in an airtight container.
Coconut oil: Use refined coconut oil with at least 90% saturated fat content. Brands like Snappy Popcorn Oil or LouAna are formulated specifically for popping and won’t leave a strong coconut taste. One gallon costs $15–$25 and lasts dozens of batches. Avoid virgin or unrefined coconut oil: the flavor is too pronounced.
Flavacol: This fine, powdered salt contains butter flavoring and coloring agents. A 35-ounce carton runs about $10 and lasts for months. Use 1/4 to 1/2 teaspoon per 1/2 cup of kernels, more than that makes popcorn too salty. Flavacol is added to the oil before popping, not after.
Butter topping: Theaters don’t use real melted butter: they use butter-flavored soybean oil or partially hydrogenated soybean oil with artificial coloring. Products like Odell’s Supur-Kist II or Snappy Butter Burst replicate this. These toppings stay liquid at room temperature and won’t make popcorn soggy like real butter does. A quart bottle costs around $12.
Those interested in creating a complete snack station for entertaining can draw inspiration from home setup ideas that integrate dedicated prep areas into kitchen or basement layouts.
Step-by-Step Recipe for Authentic Theater-Style Popcorn
This recipe works for kettle-style poppers and stovetop methods. Adjust quantities based on popper capacity.
Materials:
- 1/2 cup yellow butterfly popcorn kernels
- 3 tablespoons refined coconut oil (90% or higher)
- 1/4 teaspoon Flavacol seasoning
- 2–3 tablespoons butter-flavored topping (to taste)
Tools:
- Popcorn maker (kettle-style or stovetop Whirley Pop)
- Large bowl (at least 4-quart capacity)
- Measuring cups and spoons
- Oven mitts or heat-resistant gloves
Instructions:
-
Preheat the popper. For kettle machines, turn on the heat and let the kettle warm for 2–3 minutes. For stovetop poppers, set burner to medium-high heat.
-
Add oil and Flavacol. Pour the coconut oil into the kettle or pot. Add the Flavacol and stir briefly. The salt will dissolve into the oil as it heats.
-
Add kernels. Pour in the popcorn kernels and spread them evenly across the kettle bottom. For stovetop poppers, begin cranking immediately. For kettle machines, close the lid and let the stirring mechanism (if equipped) do the work.
-
Monitor popping. Kernels should start popping within 60–90 seconds. Once popping slows to 2–3 seconds between pops, turn off the heat immediately. Leaving it on longer burns the popcorn.
-
Dump and season. Pour the popcorn into a large bowl. Drizzle butter-flavored topping over the top in a circular pattern. Toss gently with clean hands or a large spoon to distribute evenly. Repeat drizzling and tossing until coverage is even.
-
Serve immediately. Theater popcorn is best eaten fresh. It stays crisp for about 30 minutes before moisture from the topping softens it.
Safety note: Coconut oil at 460°F can cause severe burns. Always use oven mitts when handling kettles or stovetop poppers. Keep children and pets clear of the work area during popping.
Creating the Perfect Home Theater Experience
Theater-quality popcorn deserves a dedicated station, especially for homeowners with finished basements or media rooms. Setting up a permanent or semi-permanent popcorn area keeps equipment accessible and reduces cleanup time.
Setting Up Your Popcorn Station
A functional popcorn station needs three zones: prep, popping, and serving.
The prep zone stores kernels, oil, Flavacol, and topping within arm’s reach. Use a small cabinet, rolling cart, or wall-mounted shelves. Keep ingredients in airtight containers to prevent moisture absorption, humidity makes kernels pop unevenly. Label containers clearly: Flavacol looks similar to regular salt but measures differently.
The popping zone houses the machine. Countertop kettle poppers need a dedicated outlet (avoid sharing circuits with high-draw appliances like microwaves). Place the machine on a heat-resistant mat or stainless steel tray to catch stray kernels and oil drips. Position it at least 12 inches from walls or cabinets to allow steam venting.
The serving zone includes bowls, napkins, and optional toppings like grated Parmesan, ranch seasoning, or cinnamon sugar. A two-tier lazy Susan keeps condiments organized. Paper popcorn bags or reusable melamine bowls work better than flimsy disposable containers.
Integrate the station into existing room design using materials that match cabinetry or trim. Those planning built-in units can find comprehensive design and material advice for custom shelving and countertop installations.
Electrical considerations: Kettle poppers draw 500–1000 watts. Verify the outlet is on a 15-amp circuit with no other high-draw devices. If installing a dedicated outlet, hire a licensed electrician to ensure compliance with NEC Article 210 requirements for branch circuits.
Cleanup tip: Wipe down the kettle with a dry paper towel while still slightly warm. Coconut oil solidifies at room temperature, making it harder to remove once cooled. Wash removable parts with warm soapy water: avoid abrasive scrubbers on non-stick surfaces.